
Caution: PTV's "Truck Attributes" became legacy data. PTV recommends implementing Feature Layer theme "PTV_TruckAttributes" to use truck attributes for route planning. Benefit from the time-dependent attributes and combinations with the other themes such as "PTV_TrafficIncidents"!
The RoadEditor data consists of a variety of attributes which describe
the properties of a road segment or a ferry. There are RoadEditor
layers with data provided by PTV, but it is also possible to create
your own RoadEditor layer. Please note that the RoadEditor data must
match the map data exactly and cannot be used with a different map.
Even a map update will invalidate the RoadEditor data. The user can
then decide which of these attributes should be considered for the
route calculation. Some map data already contain additional attributes
for road segments (e.g.
BLOCKS_CAR
). If the RoadEditor is enabled, the route calculation will consider
these attributes by default. User defined parameters that override a
flag within the map data will also be considered without further
parameterization.
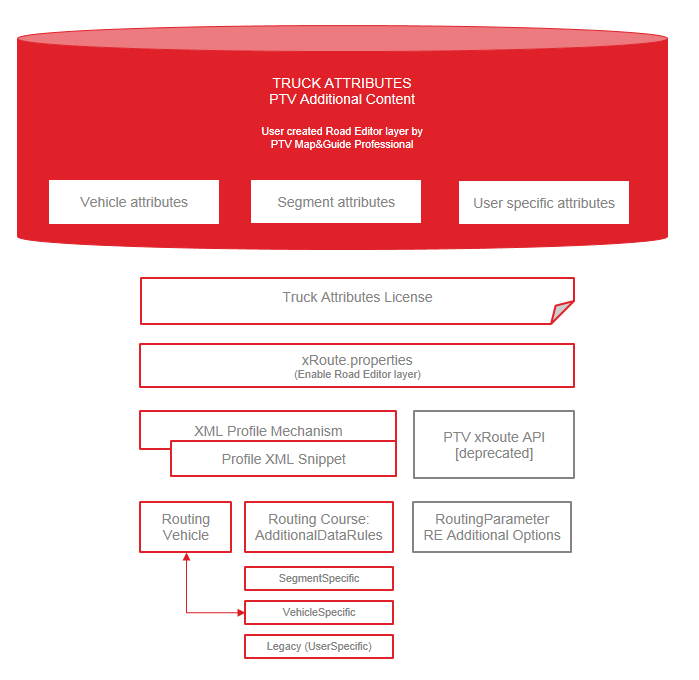
The considered attributes may refer to vehicle attributes (e.g. consider the weight or the length of the vehicle) or they may override segment specific map data (e. g. the length or the speed of a segment) for route calculation. Apart from these vehicle and segment specific attributes, user specific attributes can be configured. These three categories refer to the three sub-elements of the AdditionalDataRules element in the XML profile.
The user can then choose between the following options.
Automatically assign all road attributes to the vehicle in question (recommended for truck attributes).
Manually choose the road attributes to be used (recommended for user-specific data).
Following the RoadEditor, data is considered by routing. Additionally, the segment attributes are available for the route description and also reported for segments with direction hint.
Truck attributes (truck-specific driving restrictions) are special data content which can be added to the PTV maps. More information about the Truck attributes format can be found here. These attributes concern the dimension, the weight or the type of the vehicle. For example, this could be important for the clearance height of tunnels or the weight restriction of bridges. As these attributes are considered in the routing, you gain more accuracy and a better planning basis. PTV provides these truck-specific driving restrictions on demand as they have to be additionally licensed.
The PTV xRoute Server integrates truck attributes as an additional layer and can take them into account for routing. This data will be used in PTV xRoute Server which takes into account the vehicle characteristics such as dimensions or weight.

The following example illustrates how the use the RoadEditor considering the height attribute for trucks. The height is set 350 cm at first and afterwards 420 cm. Passage is free only for the first request. The limited value is here exactly 400 cm.

Passage free: Height limits weren't reached.
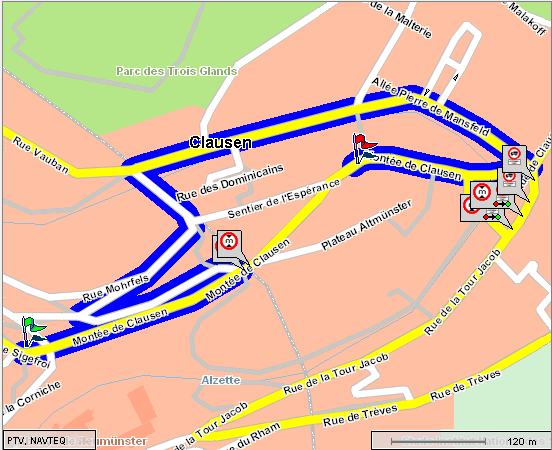
Passage is not free: Detour was calculated, height limits were reached.
The official tunnel restriction codes will be taken into account for extended route calculation. Therefore the truck attribute data contain segment attributes to indicate the tunnel category.
| Restriction code of the whole load of the vehicle | Truck attribute threshold value | Restricted tunnel category |
|---|---|---|
| None | 0 | Not considered |
| B | 131 | B, C, D and E |
| C | 121 | C, D and E |
| D | 111 | D and E |
| E | 101 | E |
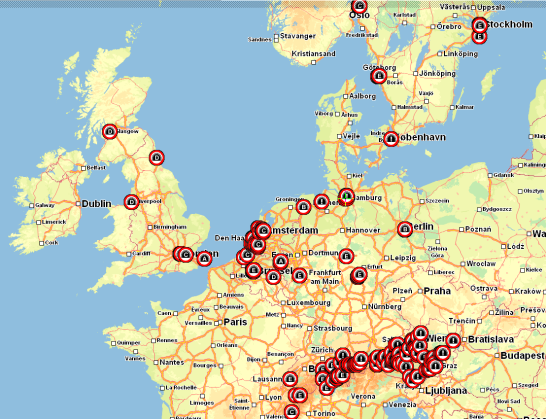
The next figure shows an overview of the European tunnels which use the TRC. The function takes the restriction code into account. Vehicles which have a restriction code in their transport document (B-E) are forbidden to transit tunnels which are signed with restriction code E (see figure). A detour will automatically be processed and plotted. The code must be written in each transport document which is mandatory for the truck driver. The value (A-E) determines whether a truck may transit a tunnel or not.

Additionally, in PTV Map&Guide desktop you have the possibility of modifying the attributes of street segments. For example, street segments could be blocked or unblocked for a vehicle. This data can then be exported to a binary layer usable by other PTV xServer. By doing so, you integrate your know-how into the map and again gain more accuracy. Please note that it is not possible to add or delete street segments.

The RoadEditor layer will be soon a deprecated technology, substituted
by the new technology Feature
Layer.
The technology still has to be used for PTV Truck Attributes and RoadEditor layer created with PTV Map&Guide Professional.
Truck-specific routing is a matter of time and costs: For the best and most cost-efficient route you have to avoid situations where trucks get stuck and have to take a detour. You also want the individually best route for each vehicle, according to its height or weight or its type of cargo: The best route for a heavy truck with hazardous goods might not suite a light truck loaded with food. Truck data allows you to calculate the best route according to the size or weight of a vehicle, or according to its type of cargo, and to the time of day at which a restriction may be valid or not. (Yes, regular maps do include general truck blockings. But these only help you avoid forbidden roads completely, no matter which size, weight, load etc. your vehicle has.)
What does truck data include?
Find out which service method supports which RoadEditor data.
| service method | RoadEditor |
|---|---|
| calculateRouteInfo | x |
| calculateRoute | x |
| calculateExtendedRoute | x |
| calculateTour | x1 |
| calculateAdvancedTour | x1 |
| calculateMatrixInfo | x |
| calculateReachableObjects | - |
| searchForReachableObjects | - |
| calculateIsochrones | - |
1 calculateTour and calculateAdvancedTour do not support RoadEditor by database and feature layers with enabled time-dependency.
Please note that the RoadEditor data must match the map data exactly and cannot be used with a different map. Even a map update will invalidate the RoadEditor data. Please contact your PTV representative for more information on updating maps.
The PTV xRoute Server can only address one RoadEditor layer per request. If the RoadEditor layer is used together with a truck attributes layer, it is necessary to combine the two layers into a single layer first.
The xServer folder contains the truck attributes for a dedicated map:
In the map folder create a subfolder with the name re. The map folder is specified in the following configuration file: PTV xServer folder/conf/servername.properties in the maps.pathkey. Copy all TruckAttributes_Mapname.bin files to the re folder. The Roadeditor layer name is then TruckAttributes_Mapname. In order to avoid a change of the Roadeditor layer name to the last version you can rename the three files in the same way e.g. to TruckAttributes.bin, TruckAttributes.bin.ini and TruckAttributes.bin.lif. So you get the Roadeditor layer name TruckAttributes. Alternatively you can copy the files in a subfolder e.g. TruckAttributes and put the three files in there without renaming it. If you use then the Roadeditor layer name TruckAttributes, the binary files are searched in the subfolder TruckAttributes.
In order to use truck attributes with the PTV xServer, you need to activate the following two licence keys:
For PTV xRoute Server: xroute.roadEditor=true
For PTV
xMap Server: xmap.layers.roadEditor=true
To use truck attributes, check the configuration in the PTV xRoute folder/conf/xroute.properties file under roadeditor properties:
There is no additional configuration of the truck attributes necessary, you can directly start to use the layer in your requests.
The consideration of additional segment attributes can be done by referencing a specific XML profile or by adding an XML snippet to your request. Both adhere to the the structure of the xRoute Profile and can also be combined. The specific configuration is done within the AdditionalDataRules element.
Please refer to the technical concept of the Profiles. It explains how XML Profiles and the Profile Snippet Mechanism work in general. A detailed documentation of each PTV xServer Profile Scheme (XSD) is available in the subchapters.
From the PTV xRoute 1.17 on the profiles are configured using an XML format instead of the old properties format. Profiles reside on the file system where they can be referred by name. You find them in the PTV xRoute folder/conf/profiles/ folder (profilename.xml) following a defined XML schema. The RoadEditor relevant parameters are in the element AdditionalDataRules:
<AdditionalDataRules enabled="true" layerName="TruckAttributes">
Activate the Roadeditor generally with the attribute enabled. Enter the name of the layer you want to use in the attribute layerName. To make it clear here is a small example. The route calculation can consider that certain road segments are blocked for vehicles, which exceed the vehicle dimensions. So you have to specify the Roadeditor layer as above and your vehicle properties (e.g. a height of 3.5 meters) in the element Vehicle in one profile:
<?xml version="1.0" encoding="UTF-8" standalone="yes"?>
<Profile>
<Routing majorVersion="2" minorVersion="0">
<Vehicle>
<Physical>
<Dimension height="350"/>
</Physical>
</Vehicle>
<Course>
<AdditionalDataRules enabled="true"
layerName="TruckAttributes">
<VehicleSpecific enabled="true"/>
</AdditionalDataRules>
</Course>
</Routing>
</Profile>
The user can then choose between the following options.
For the first option the attribute <VehicleSpecific enabled="true"> must be set in order to assign the vehicle attributes to the truck attributes, for example to block all road segments which have a height restriction lower than the actual vehicle height.
The vehicle attributes must be specified in the Vehicle element (see use cases below). Which of these vehicle attributes has an influence on the truck attributes is very difficult to explain, thus to obtain the best result, all vehicle attributes must be set correctly. Otherwise the route calculation may return an incorrect route, which might use blocked road segments. Do not omit any attribute which seemingly does not influence routing, this assumption might be wrong.
What is more, always specify all malus values in the Malus element as can be seen in the Use Case Calculate a route for a hazardous cargo vehicle using truck attributes which is necessary to consider restrictions other than the dimensions such as residential areas properly. The default malus values are always 0 and must be specified to your needs.
For the second option the attribute <VehicleSpecific enabled="false"> should be set as the user-specific data does not necessarily conform to the truck attribute data. Enter all attributes in question in the Legacy element.
The route calculation can consider that certain road segments are blocked for vehicles, which exceed the vehicle dimensions defined for the route segments. A segment is regarded as blocked for the current vehicle if one or more vehicle attributes like total permitted weight, height, width, length, or axleLoad are exceeded. Thus, the routing result will be a valid course respecting the vehicle attributes. The units are [cm] for dimensions and [kg] for weights (cf. also the xRoute Profile documentation).
<?xml version="1.0" encoding="UTF-8" standalone="yes"?>
<Profile>
<Routing majorVersion="2" minorVersion="0">
<Vehicle>
<Physical>
<Weight totalPermittedWeight="12000"/>
<Axle axleLoad="5000"/>
<Dimension height="400" length="2000" width="300"/>
</Physical>
</Vehicle>
<Course>
<AdditionalDataRules enabled="true" layerName="TruckAttributes">
<VehicleSpecific enabled="true"/>
</AdditionalDataRules>
</Course>
</Routing>
</Profile>
This use case describes how to calculate a route for a truck with the following parameters:
Additionally, the following vehicle specific attributes have to be set, because they apply to the vehicle described above.
The route calculation can take into account that certain road segments can be augmented with these attributes. These road segments are then blocked for hazardous cargo vehicles fitting the description above.
<?xml version="1.0" encoding="UTF-8" standalone="yes"?>
<Profile>
<Routing majorVersion="2" minorVersion="0">
<Vehicle>
<Physical>
<Weight totalPermittedWeight="25000"/>
<Axle axleLoad="3500"/>
<Dimension height="380" length="1000" width="300"/>
</Physical>
<Load loadType="GOODS" hazardousGoodsType="HAZARDOUS"/>
</Vehicle>
<Course>
<AdditionalDataRules enabled="true" layerName="TruckAttributes">
<VehicleSpecific enabled="true">
<Malus hazardousGoods="2501" hazardousToWaters="2501"
vehiclesWithTrailer="2501" residential="2500" delivery="2500"
preferredForHazardousGoods="-99" preferredForTrucks="-99"/>
</VehicleSpecific>
</AdditionalDataRules>
</Course>
</Routing>
</Profile>
The truck attribute data contains segment attributes to indicate different tunnel categories (cf. xRoute profile documentation for a detailed description of the codes). In order to consider tunnel restrictions, you have to set the vehicle load attribute tunnelRestrictionCode to the corresponding threshold code (cf. table below). Road segments where the configured tunnel restriction applies, will be handled with the malus value set for restrictedTunnel.
| Restriction code of the whole vehicle load | Restricted tunnel category |
|---|---|
| None | Not considered |
| B | categories B, C, D, and E |
| C | categories C, D, and E |
| D | categories D and E |
| E | category E only |
<?xml version="1.0" encoding="UTF-8" standalone="yes"?>
<Profile>
<Routing majorVersion="2" minorVersion="0">
<Vehicle>
<Load tunnelRestrictionCode="C"/>
</Vehicle>
<Course>
<AdditionalDataRules enabled="true" layerName="TruckAttributes">
<VehicleSpecific enabled="true">
<Malus restrictedTunnel="2501" />
</VehicleSpecific>
</AdditionalDataRules>
</Course>
</Routing>
</Profile>
The route calculation can consider that certain road segments can be
augmented with vehicle specific attributes like total permitted
weight, height, width, length, or axleLoad. These road segment are
then blocked for vehicles which exceed one or more of the given
values. Sometimes there is no valid route meeting these constraints or
it is not obvious why the resulting route has to make a detour. In
such cases allowing violations for blocked road segments can help to
better understand the constraints and somehow resolve the violations.
Note that violations always are allowed globally for all
RoadEditor attributes.
<?xml version="1.0" encoding="UTF-8" standalone="yes"?>
<Profile>
<Routing majorVersion="2" minorVersion="0">
<Vehicle>
<Physical>
<Weight totalPermittedWeight="12000"/>
<Axle axleLoad="3000"/>
<Dimension height="400" length="2000" width="300"/>
</Physical>
</Vehicle>
<Course>
<Violations>
<SegmentBlockingViolations enabled="true" cost="50000"/>
</Violations>
<AdditionalDataRules enabled="true" layerName="TruckAttributes">
<VehicleSpecific enabled="true"/>
</AdditionalDataRules>
</Course>
</Routing>
</Profile>
The violations can be enabled via the SegmentBlockingViolations
element. The concrete value of the violation cost has a
major influence on the decision whether to use a route deviation
or accept one or more violated segments on the route. That means,
the resulting route will use the deviation if the cost of the
route deviation is lower than the costs of the violated segments
(added once for every violated segment).
To eliminate
unwanted route deviations, reduce this value until the desired
route is taken. Ultimately you can even set it to 0.
Send the request
If there are any violations, the route info will contain a flag hasViolations = true.
If there are any violations and the list of segments is returned, segments in the RouteSegmentList will have a filled violations attribute. Each string in the array is a violation with the following format:
<ScopeType>:<Text of specific violation>For example a map violation of blocked trucks would contain a text like
NetData:Blocks Trucks
From the PTV xRoute 1.17 on it is possible to handover the above
profile by request (the so-called snippet mechanism). Therefore you
use the key ProfileXMLSnippet in the request CallerContext.
Then in the response you get the Roadeditor information in the segment
attributes (e.g. a tunnel with a maximum height of 4 meters):
...
<segmentAttr lowEmissionZoneType="15" additionalRE="MAX_HEIGHT|0=400"
isPedestrianZone="false" hasSeparator="false" hasExtraToll="false"
hasVignetteTruck="false" hasVignetteCar="false" hasTollTruck="false"
hasTollCar="false" isBlockedTruck="false" isBlockedCar="false" isFerry="false"
  brunnelCode="TUNNEL"/
The usage of the RoutingParameters ENABLE_ROADEDITOR, ROADEDITOR_LAYERNAME and ROADEDITOR_ADDITIONAL_OPTIONS is still possible. Though we recommend to use the XML profile snippets instead. But if you are already familiar with the API, you can still parametrize your requests in this way.
The usage of the RoutingParameters
ENABLE_ROADEDITOR
,
ROADEDITOR_LAYERNAME
,
START_TIME_ROADEDITOR
, and
ROADEDITOR_ADDITIONAL_OPTIONS
is still possible, though we do recommend to use the XML profile
snippets as explained in the examples above. But if you are already
familiar with the API, you can still parametrize your requests in
this way.
Please note: If you enable the additional data rules by an XML profile
or snippet as described above, vehicle attributes defined by
ROADEDITOR_ADDITIONAL_OPTIONS
are not taken into account. The vehicle specific properties have to be
set in the
Vehicle
element of the routing profile.
The segment attributes can be divided into attributes which have a
default meaning and those which have not. For example, the attribute
MAX_WEIGHT
has a default meaning which obviously is the maximum weight a
vehicle may have in order to travel the segment in question. The
attribute
OPT_MALUS1
does not have a default meaning. The data producer is free to define
the meaning of this attribute. For attributes with a default meaning
the range and the unit of the values can be found in the
documentation. For other attributes only the range is documented,
whereas the unit can be defined by the data producer.
Please note that all vehicle parameters such as weight, height, axle load, and so on must be parametrized separately for the RoadEditor. The vehicle parameters used for toll calculation will not be taken into account. This constraint does not apply for the usage of XML profiles or profile snippets. For further details see Tips and Tricks section of the XML profile use case.
To obtain the best result all segment attributes which apply to the vehicle must be set correctly. Otherwise the route calculation may return an incorrect route, which might use blocked road segments. Therefore the user must know all segment attributes, their meanings, ranges, and units contained in the data, in order to find the correct parameters. Please note that vehicle properties may have to be stated more than once if several segment attributes depend on it (such as the vehicle weight).
Using segment attributes with RoutingParameters (deprecated)
The RoutingParameter
ROADEDITOR_ADDITIONAL_OPTIONS
will accept a comma-separated list of segment attributes, each of
the form
KEY=VALUE
. Please note that for boolean parameters the values true or
1 represent switching on the consideration of the segment
attribute in question, whereas the values false or 0
switch it off. Please note also that the value has the form
MALUS;VALUE
for those segment attributes which carry both, a malus and a
parameter. Some map data already contains additional attributes for
road segments (e.g.
BLOCKS_CAR
). If the RoadEditor is enabled, the route calculation will consider
these attributes by default. User defined parameters that override a
flag within the map data will also be considered without further
parametrization. By default only segment attributes defined in the
map data and user defined attributes overriding a flag within the
map data will be considered automatically, all other segment
attributes must be switched on explicitly.
For each feature layer theme, the priority of restrictions from its
data can be manually configured with the attribute
priorityLevel
of the Theme element. Legal values are positive integer values. A
higher value of
priorityLevel
indicates a higher priority. By default, each theme has the priority
level 100. If two themes are at the same priority level, the most
restrictive feature wins in case of conflicting information (e.g. a
bonus from PTV_PreferredRoutes and a malus from
PTV_RestrictionZones).
To use feature layer data and RoadEditor data at the same time, both have to be enabled and configured separately. For further information see the specific use cases: RoadEditor, feature layer.
If either feature layer or RoadEditor data block a specific road segment, the blocking malus will be considered by all means. For other conflicting situations, it has to be differentiated between malus and speed values. If the conflicting RoadEditor data contains a malus value the RoadEditor data will be considered, if it contains a speed value the feature layer data will be considered.
Copyright © 2025 PTV Logistics GmbH All rights reserved. | Imprint