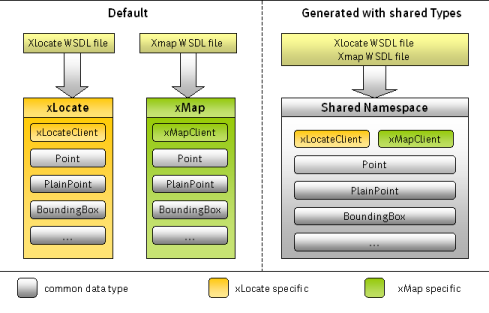
Using Visual Studio for web application development, the software automatically generates the code with the corresponding proxy classes for the given data types which are related to the their specific WSDL files. However, if you add multiple services (and WSDL files respectively) which share common data types, Visual Studio separately generates the proxy classes for each data type in its own namespace. Problems could arise when such a data type operates between two different services and both services use different proxy classes representing the same WSDL type.
For this tutorial, we used the following tools included in the .NET Framework SDK.
To give you an idea how cumbersome programming can be without shared types, we have a short look into the source code below to generate a simple map with one given address. The address will be referenced at first by using the PTV xLocate Server. The provided coordinates are used with the PTV xMap Server to render the defined map section. If you don't use the shared proxy classes, the points have a different type listed by xLocate than the points you can use with xMap. Therefore, you have to create a new xMap point and copy the values from the xLocate point. By sharing the data types only one xLocatePoint is used for the running PTV xServer.
// Add an address object
xLocate.Address addr = new Address();

// Initialize web service clients
xMap.XMapWSService xMapClient = new	xMap.XMapWSService();
xLocate.XLocateWSService xLocateClient = new xLocate.XLocateWSService();

// Return candidates by using findAddress()
xLocate.AddressResponse response = xLocateClient.findAddress(addr, null, null, null, null);

// Define xLocatePoint
xLocate.PlainPoint xLocatePoint = response.wrappedResultList[0].coordinates.point;

// Create class mapSection and define the corresponding attributes
// and copy the coordinates from xLocatePoint
xMap.MapSection mapSection = new xMap.MapSection();
mapSection.center = new xMap.Point();
mapSection.center.point = new xMap.PlainPoint();
mapSection.center.point.x = xLocatePoint.x;
mapSection.center.point.y = xLocatePoint.y

// Call method renderMap()
xMap.Map map = xMapClient.renderMap(mapSection,	mapParams, imageInfo, null, false, null);
Hereby, copying values back and forth can be by generating shared types via the WSDL generator as follows:
// <-- shared namespace w/ shared types (proxy classes)
using xserver;

Address addr = new Address();

XMapWSService xMapClient = new XMapWSService();
XLocateWSService xLocateClient = new XLocateWSService();

AddressResponse response = xLocateClient.findAddress(addr, null, null, null, null);

Plain xLocatePoint = response.wrappedResultList[0].coordinates;

// Define mapSection and reference center to xLocatePoint
MapSection mapSection = new MapSection();
mapSection.center = xLocatePoint;

Map map = xMapClient.renderMap(mapSection, mapParams, imageInfo, null, false, null);
The default way to use a web service with Visual Studio .NET is to start the "Add Web Reference..." assistant. This assistant lets you select a WSDL file and generates automatically all necessary files to use the web service in your project. Unfortunately, the assistant doesn't allow you to select multiple WSDL files and generate code with shared proxy classes. That is why we are going to use the command line tools which are part of the .NET Framework SDK Tools (version ≥ 2.0).
In the first step, we use disco.exe to generate the so called "discomaps" which are relevant in the following step. In addition, the files will be created, downloading the specified WSDL file and saving it into the current working directory.
In order to use an HTTP proxy run disco.exe with the appropriate
parameters:
disco.exe /proxy:[url] /proxyusername:[username]
			/proxypassword: [password]
.
C:\working_dir> disco.exe http://localhost:50010/xmap/ws/XMap?WSDL
C:\working_dir> ren results.discomap XMap.discomap
C:\working_dir> disco.exe http://localhost:50020/xlocate/ws/XLocate?WSDL
C:\working_dir> ren results.discomap XLocate.discomap
Start wsdl.exe to generate proxy classes for the web services and the
data types. The most important parameter is the
/shareTypes
switch as described in the command line below. The generator creates
the proxy classes which are shared between the services. The
/out:
parameter specifies the file name for the generated code and the
/namespace:
parameter determines the namespace wherein the classes have been
placed.
C:\working_dir> wsdl.exe /shareTypes /namespace:xserver /out:XServer.cs XMap.discomap
  XLocate.discomap
Using the generated code, simply include the
XServer.cs
file in your project as you would do it with any other files. But do
not edit this file. Otherwise, all your modifications are lost by
re-generating the file. In general, it is good practice to separate
generated and handwritten code for the same reason. Create another
file to add source code (e.g. convenient constructors) to the proxy
classes.
Copyright © 2025 PTV Logistics GmbH All rights reserved. | Imprint