How to Use Feature Layer PTV_TruckWaitingTimes
The Feature Layer PTV_TruckWaitingTimes provides data about waiting times for trucks at toll booths along a route. With the PTV xRoute and PTV xMap Server you are able to consider these waiting times in your route calculation and to visualize them on the map.
Related Topics
The following topics might be relevant for this use case.
Terminology
- Feature Layer
-
The Feature Layer (FL) defines the additional data mechanism. The data is partitioned into several themes that characterise different use cases. For example PTV_TruckWaitingTimes is such additional data.
Benefits
PTV xRoute Server
-
Using the Feature Layer
PTV_TruckWaitingTimes you can get a routing result respecting truck waiting times along the route, so time losses at toll booths get quantifiable.
PTV xMap Server
Additionally, users can easily visualizePTV_TruckWaitingTimes data on a map using the PTV xMap Server. This visualisation on the map has the following benefits for customers:
-
Visualizing Feature Layer
PTV_TruckWaitingTimes data can help decide, if a route which was calculated by taking truck waiting times into account, can be favoured over another route or should be avoided.
Prerequisites
Check, if the following prerequisites are fulfilled before you start with the use case.
-
PTV xRoute Server or PTV xMap Server and a digital map of the area for route calculation.
-
Correct installation of the Feature Layer PTV_TruckWaitingTimes. The usage of this Feature Layer with the PTV xRoute Server in conjunction with the PTV xMap Server is only available in version 1.22.0 or higher.
-
In order to request information from the Feature Layer theme PTV_TruckWaitingTimes, you need to ensure that your license includes the following keys:
-
PTV xRoute Server: xroute.featureLayerThemes=
PTV_TruckWaitingTimes
-
PTV xMap Server: xmap.featureLayerThemes=
PTV_TruckWaitingTimes
Concept
Feature layers are designed to provide various additional data to the user. The content depends on the feature layer theme and can be configured via XML profile. In the PTV xRoute server, feature layer data can be requested as generic FeatureDescription element for each route segment.
Installation Guide
-
Download the latest Feature Layer PTV_TruckWaitingTimesfrom the Customer Area according to the used map. If you don't have an account, please contact your account manager at PTV.
-
Unzip the PTV_TruckWaitingTimes_<Mapname>.zip file directly to the map folder of the PTV xServer. The map folder is specified in the maps.path key of the configuration file <PTV xRoute folder>/conf/xroute.properties or <PTV xMap folder>/conf/xmap.properties.
-
Restart the PTV xServer to activate the just installed feature layers..
-
Use the PTV xRoute Server or/and the PTV xMap Server and activate the PTV_TruckWaitingTimes Feature Layer via Profile or Profile XML Snippet within the server request.
Programming Guide
Feature Matrix for Feature Layer: PTV_TruckWaitingTimes
Find out which service method of the PTV xRoute Server supports the PTV_TruckWaitingTimes Feature Layer theme.
| calculateRouteInfo |
x |
| calculateRoute |
x |
| calculateExtendedRoute |
x |
| calculateTour |
- |
| calculateAdvancedTour |
- |
| calculateMatrixInfo |
x |
| calculateReachableObjects |
- |
| searchForReachableObjects |
- |
| calculateIsochrones |
- |
Use a PTV xRoute request with at least two stations where a waiting situation at a toll booth is in between and enable the use of the Feature Layer theme PTV_TruckWaitingTimes by setting the following XML profile snippet in the CallerContext of this request.
<?xml version="1.0" encoding="UTF-8" standalone="yes"?>
<Profile xmlns:xsi='http://www.w3.org/2001/XMLSchema-instance'>
 <FeatureLayer majorVersion='1' minorVersion='0'>
  <Themes>
   <!--enable the PTV_TruckWaitingTimes theme-->
   <Theme id='PTV_TruckWaitingTimes' enabled='true'/>
  </Themes>
 </FeatureLayer>
 <Routing majorVersion='2' minorVersion='0'>
  <Course>
   <!--enable additional data rules to enable routing with additional content like feature layer-->
   <AdditionalDataRules enabled='true'/>
  </Course>
 </Routing>
</Profile>
Below you can find a JSON sample request which can be directly copied and put into the raw request runner of an xRoute Server to be tested.
 JSON sample Request: Routing through a waiting situation with the method
 calculateRoute():
{
  "waypoints": [
  {
    "$type": "WaypointDesc",
    "linkType": "AUTO_LINKING",
    "fuzzyRadius": 0,
    "coords": [
    {
      "$type": "Point",
      "point": {
        "$type": "PlainPoint",
        "x": 315734,
        "y": 6243344
	  }
    }
    ]
  },
  {
    "$type": "WaypointDesc",
    "linkType": "AUTO_LINKING",
    "fuzzyRadius": 0,
    "coords": [
	{
      "$type": "Point",
      "point": {
        "$type": "PlainPoint",
        "x": 315456,
        "y": 6242857
      }
    }
	]
  }
  ],
  "options": [
  {
    "parameter": "START_TIME",
    "value": "2016-10-10T09:00:00+00:00"
  }
  ],
  "exceptionPaths": null,
  "details": {
    "manoeuvres": true,
    "texts": false,
    "nodes": false,
    "binaryPathDesc": false,
    "polygon": true,
    "detailLevel": "STANDARD",
    "dynamicInfo": true,
    "segments": true,
    "segmentAttributes": false,
    "manoeuvreAttributes": false,
    "brunnelManoeuvres": false,
    "urbanManoeuvres": false,
    "manoeuvreGroups": false,
    "tollManoeuvres": false,
    "boundingRectanglesC": 0,
    "boundingRectanglesOffset": 0,
    "totalRectangle": false,
    "featureDescriptions": true
  },
  "callerContext": {
    "properties": [
    {
      "key": "CoordFormat",
      "value": "PTV_MERCATOR"
    },
    {
      "key": "ResponseGeometry",
      "value": "WKB"
	},
    {
      "key": "ProfileXMLSnippet",
      "value": "<Profile xmlns:xsi='http://www.w3.org/2001/XMLSchema-instance' xsi:noNamespaceSchemaLocation=\"http:///xroute/schema/XRouteProfile.xsd\"><Common language='en' majorVersion='1' minorVersion='0'/><Routing majorVersion='2' minorVersion='0'><Course><AdditionalDataRules enabled='true'/></Course></Routing><FeatureLayer majorVersion='1' minorVersion='0'><GlobalSettings enableTimeDependency='true'/><Themes><Theme id='PTV_TruckWaitingTimes' enabled='true'/></Themes></FeatureLayer></Profile>"
    }
    ]
  }
}
By setting "dynamicInfo" : "true" in the request you will receive the actual waiting time for the route in the response (timeLoss).
The following table shows the impact and difference of PTV_TruckWaitingTimes at different times of the day compared to the regular routing without Feature Layer using the request above.
| Time stamp
|
Travel time with
PTV_TruckWaitingTimes
|
Travel time without
PTV_TruckWaitingTimes
|
10/10/2016
09:00 am |
84 seconds |
17 seconds |
10/10/2016
12:00 pm |
46 seconds |
17 seconds |
Visualisation of PTV_TruckWaitingTimes on the Map
This section describes the general workflow on how to visualizePTV_TruckWaitingTimes on the map.
Workflow
-
Ensure that the
PTV_TruckWaitingTimes theme is correctly installed and licensed for your PTV xMap Server.
-
In order to activate the use of
PTV_TruckWaitingTimes, the sample JSON request below must set at least the following parameters.
-
The reference coordinates of the bounding box.
-
The starting reference time (note that
PTV_TruckWaitingTimes is a time dependent theme).
-
The
imageinfo element defining the size and format of the returned image.
-
A valid
ProfileXMLSnippet shown hereunder enabling the Feature Layer to be visualized.
-
Send the JSON sample request to PTV xMap Server and have a look at the resulting image.
ProfileXMLSnippet: Enabling Feature Layer PTV_TruckWaitingTimes
<Profile xmlns:xsi='http://www.w3.org/2001/XMLSchema-instance'>
  <FeatureLayer majorVersion='1' minorVersion='0'>
    <!--enable the time dependency because we are using the time dependent PTV_TruckWaitingTimes theme-->
    <GlobalSettings enableTimeDependency='true'/>
    <Themes>
      <!--enable the PTV_TruckWaitingTimes theme-->
      <Theme id='PTV_TruckWaitingTimes' enabled='true'/>
    </Themes>
  </FeatureLayer>
</Profile>
Default Rendering Settings for PTV_TruckWaitingTimes
The following section shows the default settings of the PTV_TruckWaitingTimes Feature Layer in the silkysand rendering style, which is used for the following examples. These settings are displayed and summarized with the associated XML snippets. Please refer to About Feature Layer Rendering for an overview of all rendering possibilities.
This sample rendering profile displays different icons on the map depending on the duration of the waiting time at toll booths by using the start time of the route.
The Feature Layer differs between three classes with different waiting time ranges.
<Theme id="PTV_TruckWaitingTimes">
  <OverlappingResolution scope="ALL_THEMES" forceDisplay="false" maximumDisplacement="0"/>
<!--- definition of displayed icons for each display class, icons are placed in the bitmap directory which is defined in xmap.properties -->
  <Class name="Waitingtimes-short">
    <Filter>
      <Condition displayClass="WaitingTime">
        <Range values="0-30"/>
      </Condition>
    </Filter>
    <Style>
      <Icon displayRange="9-16" url="./22x22/truck/truck_waiting_toll_short.bmp"/>
      <Icon displayRange="17-19" url="./24x24/truck/truck_waiting_toll_short.bmp"/>
      <Icon displayRange="20-23" url="./32x32/truck/truck_waiting_toll_short.bmp""/>
    </Style>
  </Class>
  <Class name="Waitingtimes-average">
    <Filter>
      <Condition displayClass="WaitingTime">
        <Range values="31-60"/>
      </Condition>
    </Filter>
    <Style>
      <Icon displayRange="9-16" url="./22x22/truck/truck_waiting_toll_average.bmp"/>
      <Icon displayRange="17-19" url="./24x24/truck/truck_waiting_toll_average.bmp"/>
      <Icon displayRange="20-23" url="./32x32/truck/truck_waiting_toll_average.bmp""/>
    </Style>
  </Class>
  <Class name="Waitingtimes-long">
    <Filter>
      <Condition displayClass="WaitingTime">
        <Range values="61-600"/>
      </Condition>
    </Filter>
    <Style>
      <Icon displayRange="9-16" url="./22x22/truck/truck_waiting_toll_long.bmp"/>
      <Icon displayRange="17-19" url="./24x24/truck/truck_waiting_toll_long.bmp"/>
      <Icon displayRange="20-23" url="./32x32/truck/truck_waiting_toll_long.bmp""/>
    </Style>
  </Class>
</Theme>
The ranges for the maximum waiting times can be set in the <Range values> tag. Note that the unit of this tag is in seconds. The representation of icons can be configured with the <Style> tag of a class. A DisplayRange is specified for each icon, i.e. a range of the zoom level at which icons sizes should be toggled bigger or smaller. By default, three icons (green, orange, red) ship with any PTV xServer in three different sizes (22px, 24px and 32px) to display truck waiting times.
The following table explains the classes with the regarding waiting times and icons:
| Class | Waiting time
in seconds | Icon |
| Short | 0-30 | |
| Average | 31-60 | |
| Long | 61-600 | |
Icons are always placed at the locations of toll booths. These points are given by the map provider and are integral parts of the PTV_TruckWaitingTimes Feature Layer. If a map does not support PTV_TruckWaitingTimes you will not be able to see any icons. Be also aware that a changed zoom level at DisplayRange can cause loss of performance!
Below you can find a JSON sample request which can be directly copied and put into the PTV xMap Server's Raw Request Runner to display truck waiting times on a map.
JSON sample Request: Visualise Truck Waiting Times in Paris
					{
  "mapSection": {
    "$type": "MapSection",
    "center": {
      "$type": "Point",
      "point": {
        "$type": "PlainPoint",
        "x": 261422,
        "y": 6253564
      }
    },
    "scale": 5000,
    "scrollHorizontal": 0,
    "scrollVertical": 0,
    "zoom": 0
  },
  "mapParams": {
    "showScale": true,
    "useMiles": false,
    "referenceTime": "2015-08-11T16:00:00+02:00"
  },
  "imageInfo": {
    "format": "GIF",
    "width": 400,
    "height": 400,
    "imageParameter": ""
  },
  "layers": null,
  "includeImageInResponse": true,
  "callerContext": {
    "properties": [
      {
        "key": "CoordFormat",
        "value": "PTV_MERCATOR"
      },
      {"key": "Profile",
       "value": "silkysand"
      },
      {
        "key": "ProfileXMLSnippet",
        "value": "<Profile xmlns:xsi=\"http://www.w3.org/2001/XMLSchema-instance\" xsi:noNamespaceSchemaLocation=\"http:///xmap/schema/XMapProfile.xsd\"> <FeatureLayer majorVersion=\"1\" minorVersion=\"0\"> <GlobalSettings enableTimeDependency=\"true\"/> <Themes> <Theme enabled=\"true\" id=\"PTV_TruckWaitingTimes\"/> </Themes> </FeatureLayer> </Profile>"
      }
    ]
  }
}
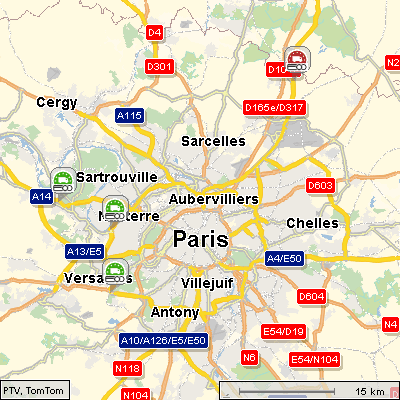
Displaying waiting times in Paris with the PTV xMap Server.
Copyright © 2025 PTV Logistics GmbH All rights reserved. | Imprint


